Easter Egg in Gmail – The ‘.’ Keyboard shortcut
November 22nd, 2007
Hi guys, I happened to discover this cool new keyboard shortcut in the new gmail interface. This shortcut will work only if you have enabled keyboard shortcuts.
After logging in, press the ‘J’ key just to make sure that keyboard shortcuts are working. Once done with that, press ‘.’ (dot) key. The “More Actions” combo box will now expand. Use the standard arrow keys to move among the list of labels and actions. To move out of the combo box, press Escape key.
Example Uses:
- Use the ‘x’ key to select a few messages/conversations.
- Press ‘.’ (dot) to expand the “More Actions” box.
- Select a label and press ‘Enter’.
- The label will now be applied to the selected conversations. 😀
That said, the “More Actions” drop down is not an actual combo box. It’s done using DIVs and CSS.
P.S.: To enable keyboard shortcuts, first login to gmail. Then click “Settings” at the top right corner of the window. Now click “Keyboard shortcuts on” and click on “Save Changes” button at the bottom.
Gotchas in installation of Apache, MySQL and PHP
September 23rd, 2007
Yesterday, I configured apache 2.2.3, php 5.2 and mysql 5.0.18. Alright, I know that’s not a big deal. But here are a few things that you must do in order for them to work seamlessly.
httpd.conf:
Add the following 4 lines to httpd.conf so that php will work correctly.
- LoadModule php5_module /path/to/php/php5apache2_2.dll
- PHPIniDir /path/to/php.ini (E.g. PHPIniDir “C:/PHP”. Note that the the path doesn’t end with “/php.ini”).
- AddType application/x-httpd-php .php – This tells apache to handle PHPÂ requests. If you want to add more extensions for php, E.g. say you want to process “.abc” files as PHP, then add “AddType application/x-httpd-php .abc”.
- Find this line in your httpd.conf “DirectoryIndex index.html” and replace it with “DirectoryIndex index.html index.php”.
php.ini:
Go to the folder where you installed PHP. Open php.ini in your favourite text editor and find the line that says extension_dir = “./”. Replace that line with extension_dir = “/path/to/ext/folder”. Note that, there should be no trailing slash to the value of extension_dir.
my.ini:
Now go to the folder where you installed MySql. Try to start the MySQL daemon. I’m assuming that you haven’t installed MySQL as a service. If the mysql daemon (mysqld.exe) is running, try connecting to it by issuing the command on the command prompt.
“mysql -u <user_name>”
If you get an error like this “ERROR 2003 (HY000): Can’t connect to MySQL server on ‘localhost’ (10061)”, open your my.ini file. Find the line that says “port=3306”. Replace it with a port number of your choice. There will be 2 such lines in my.ini. One is for server and the other is for client. Now try connecting again.
To run the mysql server in verbose mode, instead of just double clicking on mysqld.exe, open command prompt and type “mysqld –console“. This will give you a quick overview of what is happening.
When you run your php scripts that connects to mysql, you should now specify the port number also (if it is not 3306). E.g. $con = mysql_connect(“localhost:4000“, “user”, “password”);
After all these changes, don’t forget to restart your apache server. When you get an error dialog that says that some PHP extensions cannot be loaded, make a note of those extension names first. Now, open your php.ini. Search for “extension=php_”. Above the first extension line, add the missing extension DLLs. E.g. extension=php_pdo.dll etc.
These are some of the gotchas that I faced 🙂 Next I have to try and configure a Mongrel cluster for apache for running ruby on rails apps.
Import Blogger Blogs to WordPress – Problem Resolved
September 2nd, 2007
Hi guys, wordpress 2.2.2 has a problem of importing blogger blogs to wordpress. It happens when you get an error saying, “We were not able to gain access to your account. Try starting over.“
This problem can be resolved only in custom wordpress installations i.e. you have your own domain on which you have installed wordpress (downloaded from http://www.wordpress.org/).
After login through FTP (Example FTP client is filezilla) to your web hosting provider, locate the folder where you have installed wordpress. In my case, I have installed it in a folder called “blog”.
Locate the folder “wp-admin”. Inside wp-admin, select a folder called “import”. Open the “import” folder. There’s a file called “blogger.php”. Download the file to your computer. Open the file in any of the popular text editors and go to line number 87. It looks like the first screenshot.
[Click the image for a bigger screenshot]
Line number 87 is highlighted in blue. Change “www2.blogger.com” to “www.blogger.com” (Refer to screenshot below). Save the file and upload it to the same folder from where you downloaded it.

[Click the image for a bigger screenshot]
Have fun! 🙂
Port Redirection for MT880 Routers
March 18th, 2007
Hi guys, I use the MT880 Huawei router for my broadband connection. I use the connection not as a dialled one as mentioned here but as a gateway; meaning, you can just open your favourite browser and start surfing the internet.
When I use the router as a gateway, I cannot give my system IP address to my friends to test any webpage because the router acts as a proxy. The only solution for this is port redirection. Port redirection means that a request on a particular system on a particular port will be redirected to another system on another port.
I had been trying in and out to configure the “Virtual Server” section to redirect to my system but in vain. Today, I found an excellent tutorial in one of the forum threads at vinuthomas.com, explaining the steps to achieve the same. I have downloaded the tutorial and uploaded it again on my server. Download it here and enjoy configuring your MT880 router to run your own web applications.
sc.exe
February 8th, 2007
Hi guys, due to some mess with mysql and apache and therefore unable to uninstall mysql, I looked thro’ the registry to search the entry that was important enough to remove the apache and mysql services.
On the way, I discovered a tool called “sc.exe”. Deleting a service has never become easier that that command 😀
1. Start->Run->cmd
2. sc delete service_name – where service_name is the service to be removed.
To find the service name,
1. Start->Run->services.msc
2. Find the service. The 1st column contains the service name. Use this in the sc command.
Read more about the sc.exe command.
Bye!
How-To: Create a wordpress template in 5 minutes
September 17th, 2006
Hi, how many of you have felt the need to create a new wordpress template and felt that the structure is too intimidating? We had the same feeling too until we realised how easy it is to create a wordpress template.
A few things before you need a template are,
1. Figure out the layout of your blog. That is, you should be clear about what should be placed where. Ofcourse, it’s entirely at your discretion.
2. Create a simple HTML page that show cases your layout.
3. Mould the simple page into a beautiful wordpress template.
Ready?? Ok, let’s start!
As said in point 1, I have just created a basic layout as shown in the screen shot below.

You can definitely tell about the various sections that make up the page. They are the header, content, sidebar, footer. To abstract this and give power to the template designers, wordpress has placed the various sections into different pages.
In addition to this, you have to add proper CSS to your design. Include them in “style.css”. Therefore, the files necessary are,
1. header.php -> Header
2. footer.php -> Footer
3. sidebar.php -> Sidebar
4. index.php -> Content glued with header, sidebar and footer.
5. style.css -> CSS
That is all you need to create a basic template. Clear? Any doubts? Post them here.
Designing the Template:
The HTML for our basic layout goes like this.
Have a look at the simple style sheet for the basic layout. Save this as “style.css”. We would need it later.
Now that you have saved it, open the HTML file in a good text editor. You can see <div> sections that are tagged with “header”, “footer”, “sidebar” and “content”. Let us create the header file.
1. Open notepad, and paste the code shown below. Save this file as “header.php”.
2. Copy the fragment below and save it in a new file as “footer.php”.
3. Copy the sidebar code and save it in a new file as “sidebar.php”.
4. Last but not the least, let us create the “index.php”. If you notice, there are special lines such as “<?php get_header(); ?>”, “<?php get_footer(); ?>”, “<?php get_sidebar(); ?>”. These are the functions that are used to glue the content with header, sidebar and footer. Great! we are almost done… few more minutes.
5. Create a new folder and name it as “DarlingTemplate”. Move all the newly created files, including the “style.css” to the folder. To test the new template, upload[:1] this folder to the <Wordpress_install_location>/wp-content/themes folder. Login to your blog and you will see the new template under the “Presentation” tab.
6. Click on our template name to activate it. Well, everything is cool. The template looks just like the simple HTML file we created earlier. But, what happened to the posts?
7. Open up “index.php”, replace it with the text in the following box and save it. Make sure the modified
file is uploaded to the <Wordpress_install_location>/wp-content/themes/DarlingTemplate
folder. Refresh the blog homepage. Voila!! the posts are there.
8. Oh! we are still left with 30 seconds. Take a screen shot of your theme. Save it as “screenshot.png” and upload it to
<Wordpress_install_location>/wp-content/themes/DarlingTemplate.
Now, when you login to your wordpress account, our template will have a medium sized thumbnail picture.
We have uploaded the final sample template as a zip file for your reference. Download it here.
Happy Templating! 🙂
Note:
1. You cannot upload the new template if your blog is hosted at wordpress.com.
A Simple MIDP Application using Netbeans
May 1st, 2006
The last post was on setting up the Nokia S60 SDK with netbeans 5.0. The application we are going to develop now doesn’t require the Nokia SDK. It is required only when you want to implement Nokia specific features. By the way, MIDP is called Mobile Information Device Profile. Two common versions of MIDP supported by most mobile phones across manufacturers are MIDP 1.0 and MIDP 2.0. MIDP on combination with CLDC – Connected Limited Device Configuration – allows us to build device independent applications. Both of them are products from Sun Microsystems. You can read more about MIDP here and CLDC here. Look at the huge list of mobile phones that support MIDP and CLDC.
For this application, we will use the standard emulator that ships with the netbeans mobility pack. We will create a simple application that accepts username and password. If the username is “aswin” 😉 then it will take you to the next screen. Otherwise, it will display a small error box. Understood??
Ok, be a good student and fire up Netbeans 5.0.
1. Go to File–>New Project. Select “Mobile” on the left pane and “Mobile Application” on the right pane.
2. Click “Next” and give the project name as “MyGreatMobile”. Click “Next”.
3. Select the Emulator Platform as J2ME Wireless Toolkit 2.2. Leave the other settings as it is and select “Finish”.
You should have something similar to the one shown below.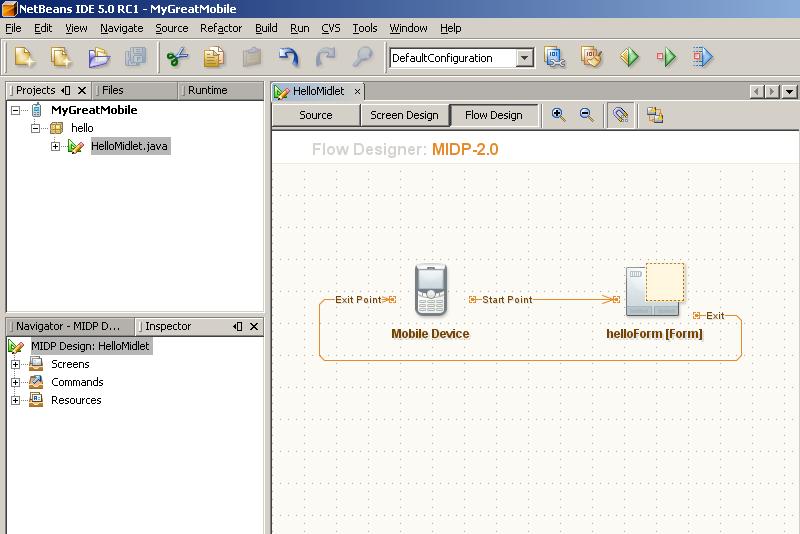
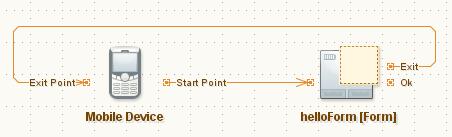
4. Choose Window–>Palette. The Palette window is now displayed. From the “Form Items” section, drag and drop 2 textfields on the “HelloForm”. The whole window should look like the one shown.
5. From the “Commands” section of the Palette, drag-n-drop and “Ok Command” and a “Exit Command”. Press F5 at anytime to view the output on the emulator.
6. Drag-n-drop a “List” and an “Alert” from the “Screens” section of the Palette. Link the “Ok” of “helloForm” to “list1”. We will link the Alert programmatically. Also d-n-d a few listitems from the “Elements” section and a “Ok Command” onto “list1”. Link the “Ok” of list1 to Form1. Check the screen shot below.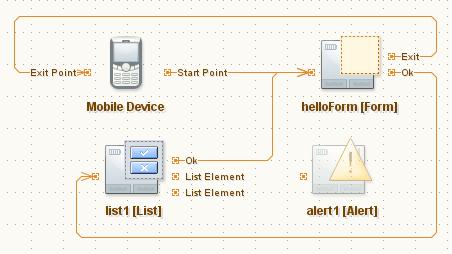
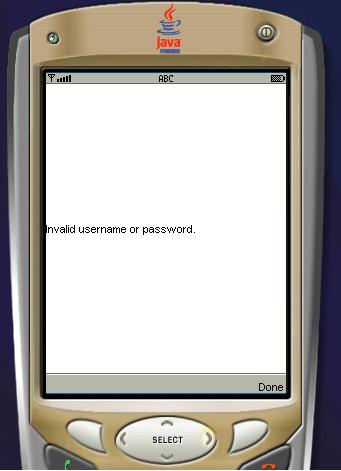
7. Double click on alert1 and change the text to “Invalid username or password”.
8. Now, if you switch to the Source view from the Flow Design view, you will be able to see that all the necessary code is generated, to implement the functionality shown in the flow design. THAT IS AMAZING!
Let us switch to Source view and do some tweaking to get the functionality we want. Find the function called public void commandAction. That function implements all the necessary conditions for navigation. It initially looks like below.
Change the code so that it is similar to the next screen shot.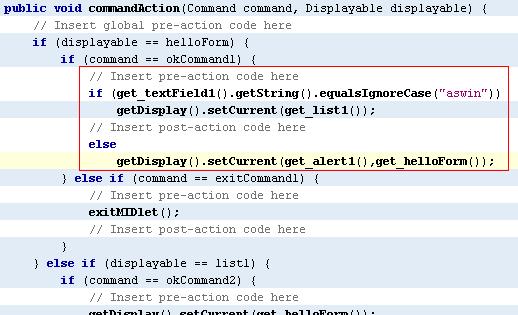
We are done. Press F5 to view the beauty 😀


The next post will be on consuming .net web services on Java ME. Bye!!
Nokia S60 Emulator Integration with Netbeans 5.0
April 27th, 2006
Hello guys, I just downloaded the Nokia S60 SDK for developing MIDP based applications for java mobile phones. Netbeans proved its mettle here again in terms of recognising the SDK and freeing me of all troubles. I downloaded the S60 SDK here and netbeans 5.0 here. CarbideJ is not required if you are going to develop on top of netbeans.
That said, i will tell you how to integrate the S60 SDK into netbeans.
1. Goto Tools–>Platform Manager and click on the “Add Platform” button.
2. Select “Java Micro Edition Platform Emulator” in the new dialog box and click on “Next”.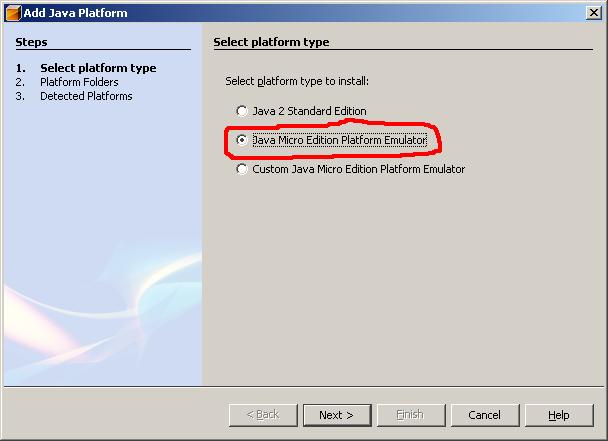
3. If the IDE is unable to locate the S60 platform folders, click on “Find More Java ME Platform Folders…” button and point it to the location where you have installed the SDK.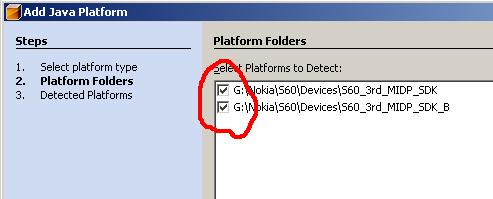
4. Click on Next. It will detect the installed platforms. Click on Finish and we are done. Close the Java Platform Manager.
Now, go to File–>New Project. Select “Mobile” on the left pane and “Mobile Application” on the right pane. Give it a name. On the next screen click on the “Emulator Platform” combo box and you will be able to see the installed emulators.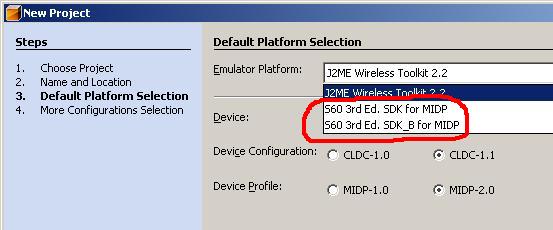
Thats it! we are done. You are up and ready to build beautiful applications for MIDP phones in just 4 steps 🙂
Mustang (Java SE 6.0)
March 10th, 2006
Hi!!, just downloaded mustang beta. Have to try it. You can also download it here. There are a lot of cool features introduced with this. Read more about it here.
It says there are improvements in UI too; and during the Sun Tech Days, they told that support was being added for Vista UI too. Let us see how the UI displays in Vista. Will post more about the UI later in the day. By the way, i have uploaded some vista pictures from my very own installation of Windows Vista :D. See them.
Bye!
Two Minute Web Browser in Java
March 7th, 2006
Hi! people, i have been hearing that a web browser in VB.NET takes 6 lines of code. How much lines of code do you think it would be in java??
Well, it takes just 3 lines of code. If you come back to me saying that it takes lot of pain to create the necessary GUI then “WTF, download netbeans”. With matisse, netbeans provides a solid foundation for designing GUIs, so that developers like me can forget GridBagLayout and rest in peace. Ok enough of that 😉
1. Open netbeans ide.
2. Create a new project. File->New Project. Select “General” and on the right pane, choose “Java Application”.
3. Click next. Give the project name as “TwoMinBrowser” and “Finish”.
Your project is ready. Go to java.net and download JDIC (JDesktop Integration Components). It doesn’t come as a part of Java SE 5.0 or J2SE 4.0. Good news is that, it is a part of Mustang (Java SE 6). Unpack the JDIC zip file and you will find a “jdic.jar”.
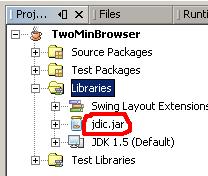
Click on the Projects tab in the IDE (Window->Projects), expand TwoMinBrowser. Now expand “Libraries” section, right click on it and select “Add JAR/Folder”. Navigate to the “jdic.jar” and add it. The projects tab should be like the image on the left.
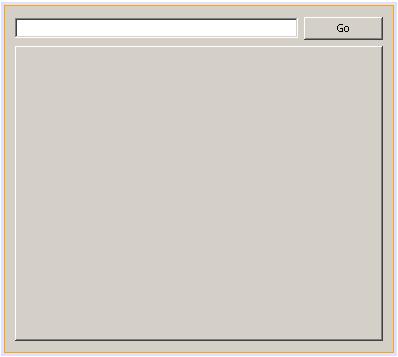
Expand “Source Packages”, right click on “twominbrowser” and select “New->JFrame Form”. Give it a name and click “Finish”. From the Palette, drag n drop a JPanel. Resize it to fit the full form. Now add a JTextField (txtUrl), a JButton and JTabbedPane (browPane). The final form should be like the screenshot on the right. Click on the image to see a bigger one.
Double click on the JButton (“Go”) or right click on it and select Events->Action->actionPerformed. Write the following code. Press Alt+Shift+F to resolve unresolved classes. Press F5. Should you get any errors, delete the Main.java from the “Source Packages” node and press F5 again. It should now compile and execute.
try
{
WebBrowser wb=new WebBrowser();
wb.setURL(new URL(txtUrl.getText()));
browPane.add(wb);
}
catch(Exception ex)
{
JOptionPane.showMessageDialog(null,ex.getMessage());
}
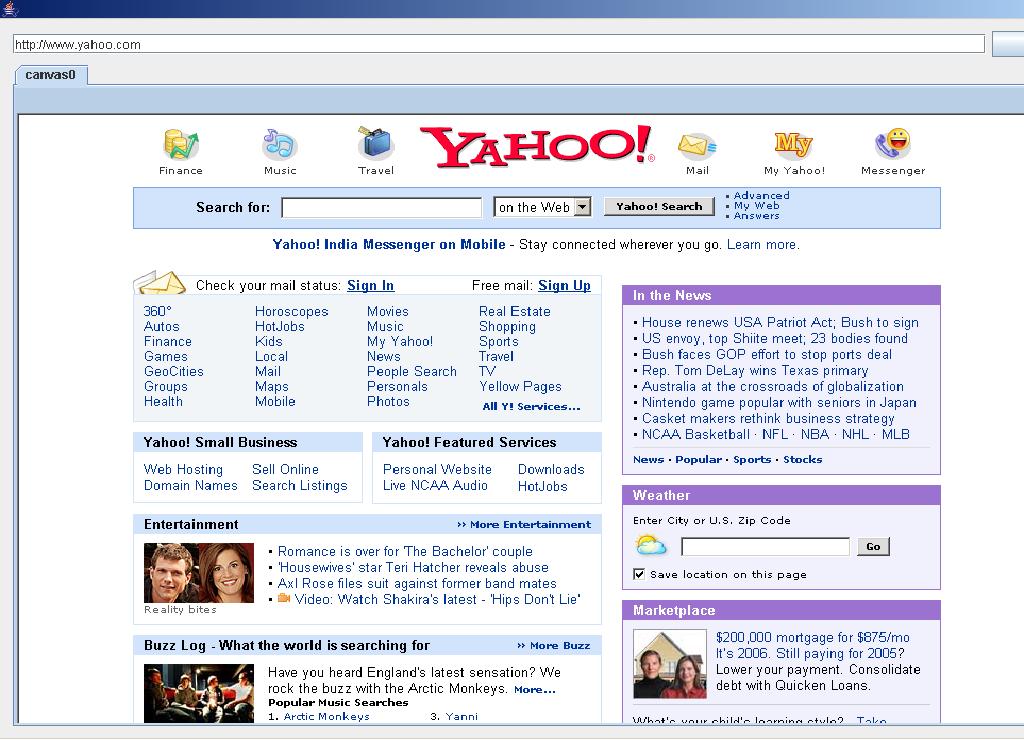
Type in a proper url at the textbox and click on “Go”. Our TwoMinBrowser will work. This is the result of display of yahoo page in our browser. The same code will work in linux also.
Change the url and click on “Go” again, you should see a new tab. Thats it, ur tabbed browser is up and running in just 3 lines of code. If you are a netbeans user already, building this will take you only 2 minutes.
As i’m writing this, Netbeans 5.5 preview release is installing. It requires JDK 1.5.0_06. In case you don’t have, download it here. Read about the UML features of Netbeans 5.5 here and here.
Bye!
Update: Geertjan has a cool post on porting this simple application to netbeans platform.